House first: Sunday I finally got around to filling in the grout around all the stone blocks I had applied to the foundation of the house. This was one tedious job. You mix up mortar in small quantities, then pour some in a large cloth funnel bag (think cake-decorating bag), then squeeze the runny mortar into the gaps between the blocks. Sounds easy enough, but when half your work is above your head that means you're holding a bag of concrete overhead for hours. It took me about half of the mortaring to finally get the hang of it and get the mix consistence just right. I'd say the first half of the project took about 4 hours and the second half 2 hours.
 Once you get the mortar in place, then you have to smooth it in the gaps and make it look good. Unfortunately with stones that are all irregular all the gaps are different sizes and shapes. Therefore there is no tool you can use to get in all the gaps, it's a finger job. I think I wore off all the fingerprints on my right hand doing this, but I managed to get it all in there and smooth, but the concrete mortar just sucks all the moisture out of your skin.
Here's the final result though, I think it looks pretty good. And now we can finish up the garage door trim and paint.
Now onto more important things, bikes. After far more painting than I had planned, I was finally able to build up the new lugged 29'er this weekend. I experimented with some new paint on the lugs, chrome paint! The lugs on the frame were actually stainless since I was planning on polishing them out, but then when I decided to use the bridgestone fork crown, I had a dilemma. The crown wasn't stainless and I couldn't make it match the polished stainless lugs. I didn't like the idea of just painting it and polishing the rest, so I decided to try something new.
Different chrome paints have been around, but none of them have historically been any good. But I came across this stuff that was terribly expensive, but of a quality that was on par with the other paints I use. I decided to try it. I learned a lot during the process of painting this one and I think future projects will go much faster because of it, but the reality is this paint job took as much time as at least three regular paint jobs combined! Was it worth the time?

I think so.
The paint is really unique. I'm not sure that I'd exactly call it chrome, but more like polished aluminum, very metal-like though. I suspect part of tha is due to my base prep, I think I can get it darker to look more like chrome with a darker base prep. 
I absolutely love how the fork crown came out though. The blue coming through the windows inside the crown and the long points are just stunning. That crown really makes the bike in my opinion.
I tried another new method on this paint job, liquid masking agent. I did about 75% of the masking with a brush on masking agent. You let it dry, then cut it out with an xacto knife. It was much easier to work with than I thought, and really left some nice crisp edges. I think I'll be using it more.
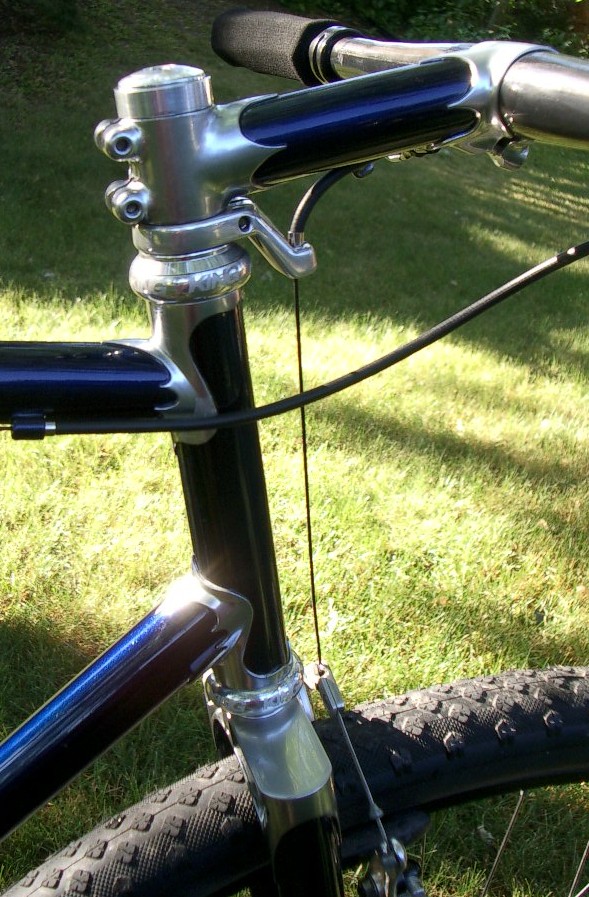
Here's the whole front end. What's a lugged mtb without a matching lugged stem? Really? I jus had to do it. That's one of Darrel McCulloch's lugged stem kits, but I turned around the back lug to give it a rise and then reshaped all the points to match the frame. You can't see it in this picture, but the headtube is finished off with a sterling silver Bob Brown Cycles logo, the finishing touch!
These stems are pretty well thought out, the steerer clamp is 28.6mm (so this one has a shim, but you can't tell) and the bar clamp is 31.8 so it can fit pretty much any size or type of bar (with a shim if needed). The lugs can be flipped to give different angles and the castings were left with extra material for shaping in the right places. Well done Darrel. Finished product is under 200g for a 135mm length!

The seatlug is pretty straightforward, but I like this picture because it gives you an idea of the depth of color on the blue. That's actually a candy blue finish, the frame is painted silver, all the blue color is in the clearcoat, so it looks really deep. Again, more labor on the paint, but worth it in the end. Candy colors are a pretty neat effect that can be very subtle or quite dramatic. I'm going to be experimenting more with them.
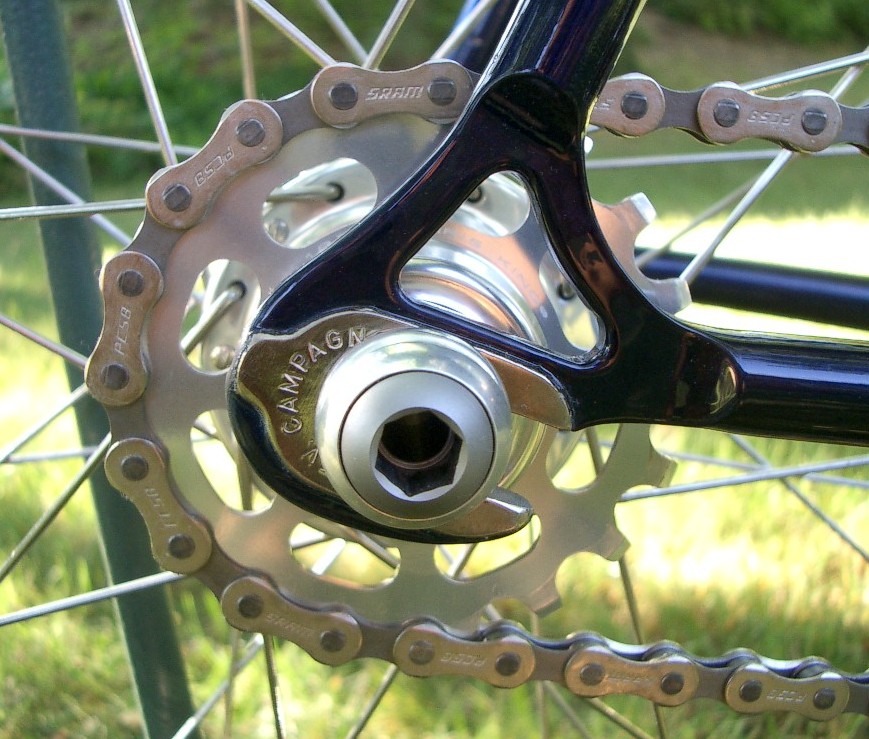 The dropouts are real chrome. These are Campy 1010b's with the deraileur hanger removed (since this is a singlespeed) I was going to use track dropouts, but I just don't think they ever look as classy as road horizontals, especially these horizontals and this bike is about class. There's really no reason to use track dropouts in a frame like this over a forward facing dropout, the wheels hold fine, especially with those huge "fun-bolts" on the King hub. I love the really big window on these too, they really knew how to make a nice looking dropout back when these were made. I've got a few sets left, so lemme know if you want them on your frame
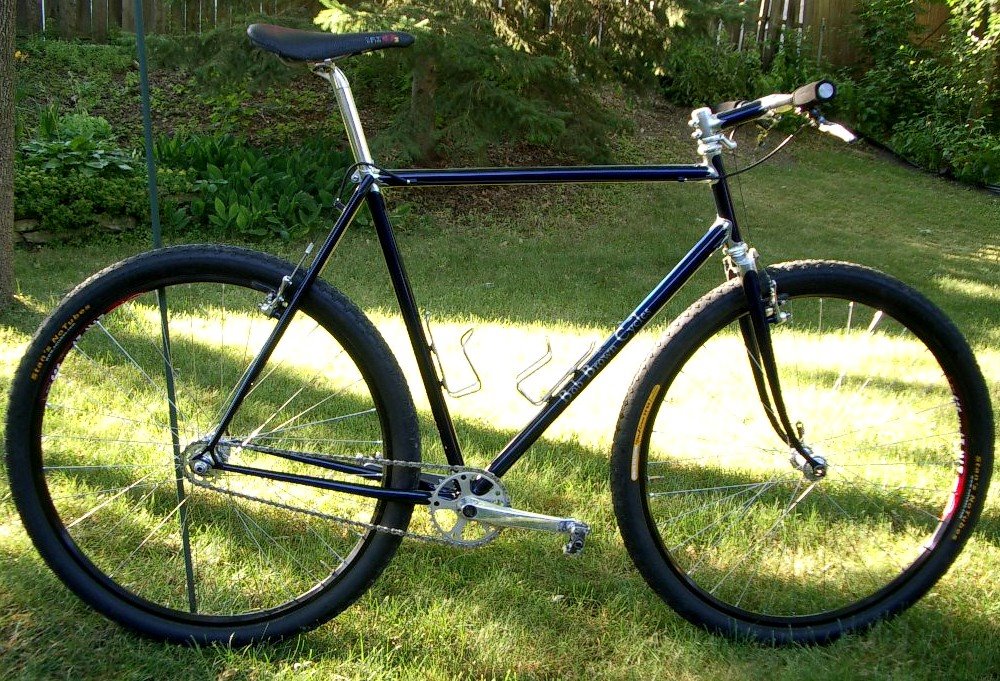 !
!
Finally, here's the whole thing built up. You had to figure out by now where those super-shiny polished XTR cranks were headed right? Polished is the theme of the bike, that along with lightweight. The whole thing comes in about 18 lbs, pretty darn good for a steel 29'er I think. The Stan's no-tubes /Chris King wheels are the main culprit in saving weight, but all the parts are reasonably light.
My only big concern with this bike is the Stan's rims/tires. I'm somewhat skeptical about their long term durability, but time will tell. They're really light, but you can also feel the large de-tensioning of the spokes when you inflate the tire to 40psi, the rims are that thin! I also spent far more time than I think it should have taken trying to get the tires to seal up to the rims. we'll see....
bbbb
8 comments:
Whoa!
That's beautiful Bob, REALLY beautiful!
Hmmm, and just yesterday I was having me a sit-down conversation with Miss Amy about that day when I have a 29'er built, as a kind of celebration gift.
Ahem...
{{HUGZZZ}} to you and Mrs. BBC from all 3 of Us.
-Me
Mr. Brown,
One word: SWEET.
Wow, it's a beaut. I'm curious how you re-made the bridgestone crown into a 29" fork. Is it as simple as taking a torch to an old fork and heating it up until the legs drop out, or is there some secret only bike builders know?
Thanks for all the comments and compliments. The crown is an actual Bridgestone crown. I did not re-heat it to remove the old blades, that would have weakened the crown too much (and this crown isn't known for being overbuilt). I had to machine out the olt tubes, then use a low-temp silver braze to rebuild the fork with longer blades to fit the 29" front wheel.
Bob
I seriously, seriously wish that Bridgestone crown was still in production.
Bob, what product/brand is the chrome paint? What product did you use for the liquid paint mask?
JG
That is a really beautiful bike!
Can you tell us what paint you used for the silver?
Thanks,
Bill
I've had a number of people asking about the "chrome" paint and what is is, how I did it, etc...
As much as I don't want to be a jerk about it, I don't really want to describe this one, it's something unique that has take me a while to make work with good results. Something that those outside of the bicycle world would call a "competative advantage".
Hope you're not offeneded, but that's all I want to say about it right now.
bbbb
Post a Comment