Tuesday, October 31, 2006

953 part 3

I've got lots I could talk about here this week, but I guess I'll start with 953 stuff since I know there are quite a few people just checking for that. Here's the next round of pictures. The frame is actually finished now.

With the front triangle done and the dropouts in the chainstays, it's time to attach the rear triangle. I usually jig up the whole back end at one time, then tack it all. Chainstays to BB first, then seatstays to seatlug and seatstays to dropouts. The chainstays are very straightforward, seatstays take a little more time to jig up correctly. For this frame the customer wanted them fastbacked to the seatlug. The slant six seatlug has a lot of area on the backside perfect for this type of attachment. Mitering fastback seatstay can be tricky though. They're very time-consuming to do by hand and tough to get to match perfectly. It's easy to miter one stay to the tube, the hard part is making the other stay match in perfect symmetry. Fortunately for me, with my mitering arrangement I can miter the seatstays for fastback attachment on my horizontal mill and make them pretty much perfect on the first try, it's a huge timesaver over filing.

Here's how they looked mitered up. Sorry about the bad picture, it was taken with my phone, couldn't find the camera that day.


Once the seat-tube end is mitered up just right I make sure the dropout end is cut right and it's ready to tack. I tack everything in the jig to make sure the dropouts are in the right spot, then take it out, put it on the alignment table to measure it and once I'm sure it's dead on, braze everything up in a workstand.

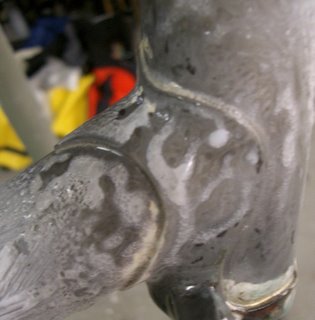
Here's how it looks after removing the flux and hitting it with some 80 grit. There's virtually no way to file or sand between the stays, so you have to make sure you lay that silver in there perfectly with the torch. I kept the fillet as small as possible as I didn't want a large amount of silver showing around the seatlug (remember, no paint).

This is without a doubt the hardest brazing to pull off on the frame. The lug is brazed to the tubes with silver so you need to be very careful not to melt out that filler while brazing the seatstays onto the lug.

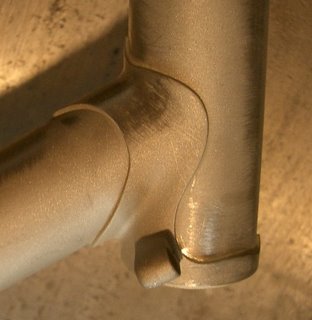
As you can see, I keep a uniform sized fillet all the way around the stays. That's not easy to do, but again, since there's no paint to hide anything I want it to look good. I want every detail of this frame to be as clean as possible and really show off the built.

And finally, here is how it looks after finishing up the seat-post clamping slot and cleaning up the seatlug.

One challenge that came up on a frame this size with compact geometry and 19mm seatstays is the length of the brake bridge. The rear end is very tight on this frame, 40.5cm chainstays and a sloping top-tube means the seatstays are quite short. When combined with the fastback attachment that makes a very tight area for the brake bridge.

The bridge that Reynolds sells with the tubing is great, perfectly machined, looks like it might be a Paragon Machine works bridge, but made from stainless. Unfortunately in this case I would have had to cut it down so much that it would be very difficult to braze it in without making a large fillet. I didn't want a lot of silver around the bridge because I felt it would detract from the look, so I made my own bridge that fit the bill better. I had to machine it from 1" round stainless stock, then mill off the faces to attaching the brake. Then I milled out the underside to keep it light. The nice part is I was able to machine it on my vertical mill to fit the stays perfectly, so when it's time to braze I was able to just sweat in silver and braze it in pace with virtually no exposed fillet. Very clean looking.

Here's the finished dropout treatment as well. I have to admit Reynolds did a nice job of sizing the dropout tabs to fit the tubes, I hardly had to file them at all to get to the finished shape shown here. The tabs match the OD of each tube exactly. I chose to file the tabs down to fit them inside the tube ends rather than my usual technique of slotting the tubing. This made for less exposed silver in each joint and a cleaner look.


Finally here's the fully built frame. I won't say it's finished because I still need to put the final finish on the stainless, but all brazing and filing are done. I'll have some pictures of the frame with the final finish in the next episode.


In other news....

I took yesterday afternoon off work, it was what will probably be the last really nice day of the fall. About 65 degrees and sunny with a forecast of 30 and windy the rest of the week. It was a moral imperative to go for a bike ride. So I broke out the fancy road bike and headed to Afton. Spectacular day for riding, wearing shorts and short sleeves felt great. I wish my legs felt as good, but they made it though and I felt really good at the end. Today it's 35 degrees out and windy as hell, glad I rode yesterday.
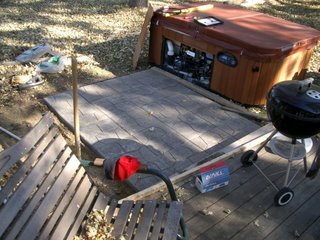
I also spent some time this weekend and yesterday working on the latest house project:

Yup, got a hot-tub. Never really thought I would, but the price was right, free. A huge thanks to my Sister-in-law's Dad who gave it to us. I had to put down a suitable pad to mount it on and I'll have to expand the deck slightly to give us a walkway. The pad went quickly but wiring it up has proven to be a challenge.

The thing has the craziest wiring I've seen. It comes stock set-up for 120v service, 20 amps. That's simple to hook-up, but it also limits the heater output and it can only run the pump or the heater, not both at the same time. So in an outdoor application the water would cool off pretty quick (especially in MN in the winter). So I followed the manufactures wiring diagram to convert it to 230v service. Well, they require a new bub-panel be installed in the vicinity of the tub, and that you have 2 GFCI breakers in that sub-panel, one of which is 120v, one is 240v. Very odd. To make it worse apparently every other hot-tub on earth just uses a single 50amp GFCI breaker in this sub-panel because they sell kits to accommodate that all over the place for pretty cheap. But the internal wiring in this baby is set up as two discrete circuits, a 20amp 120v and a 30amp 240v. None of the internal wiring is large enough to handle 50amps, so You're really stuck using this goofy set-up.

Of course no home-improvement type place actually stocks the required breakers to make this happen (you need a 30amp, 3 pole GFCI breaker!). So after calling every specialty electrical supply place in town I finally found 2. One was $168, the other $120. I opted for the $120 since they were identical part #'s. So hopefully tonight I'll be able to finish this up and start heating some water.

So between the $160 worth of wire needed to run the sub panel, the breakers, box, concrete pads,filters, etc... This "free" project is up to about $500. Oh well, it's still a great deal since the tub would have cost 10x that alone and most importantly it will make Beth really happy (and me too!).

bbbb

Monday, October 23, 2006

Achin'

Saturday morning I woke up about 7 am. It FE06 day.

For the non-Kenwoodies, that's Fall Enduro '06. Meaning a silly long mtb ride all over the cities, done once it gets too cold for a ride of this length to be a good idea. It was about 30 degrees when I rolled out of bed and ate my 4 waffles for breakfast. At least I had been smart enough to get my bike and gear all set the night before, so I just loaded up and headed over to Minneapolis after breakfast.

As regular readers know, my usual 29'er is currently serving 'cross duty and I didn't want to hassle with changing that. My shoulder is still far from good, so I knew a ride like this on the 'cross bike wouldn't be a good idea, so I pulled out 29'er #2. That one has one of those new-fangled squishy forks on it and (gasp!) more than one gear! I bet you didn't know I had a bike like that.

I decided to ride that one in an effort to keep my shoulder in check, and because on every other enduro I've been the only one on a singlespeed, which is usually fine but right now I'm not in shape to keep up with a bunch of fast guys on pavement riding gears. It felt weird. I had taken the bike out for a little shakedown just to make sure it was still working right, and everything worked flawlessly, but it just felt different. I think it's the suspension fork, I'm just so used to the rigid fork. It also felt heavy, even though it's not really. It's a 23 lb suspended, geared steel 29'er, but compared to my rigid single it felt like it weighed 100 lbs on every climb.

We left the coffee shop about 8:30 after waiting a little be for no-show-tree to not arrive. It was Stone, WW, Thorny, Billy and myself. Of course after all that bike changing, Thorny shows up on a singlespeed (dammit). We roll down to Minnehaha falls and start in on the singletrack. There's a lot of pretty technical stuff in there, and I was actually feeling better about the squishy fork and big tires in there. Man I forget how good tires other than The Crow's hook up!

As usual things fell apart in there. We got separated (happens every time) but eventually got back together at which point Billy decided I was still hurting from riding too many laps at Wirth the previous weekend (25 laps). So he pulled the pin and we were down to 4 riders.

We rode the usual route, down the dirt all the way to the riverbottoms, then across to Bloomington. About halfway across though Throny decides to heat it up and goes full time-trail pace to the Ferry Bridge. I shot off the back as I wasn't sure I'd even make it home riding that pace, much less be able to do the 'cross race the next day. We all hooked back up at the Ferry Bridge and prepared for the return trip. While we were waiting this guy on probably an '89-90 Giant mtb flys by wearing garp which coordinated with the age of his bike, black tights, white knit long sleeve top and neon green fannypack! He took off into the woods and we headed out a minute or so later. About 4 miles in we finally caught up to him and he picked up the pace. We weren't slacking off to begin with and honestly I think we were pushing it keeping up with him. We all finally had to stop at the raft to cross 9 mile creek, so we got to talk to him. Turns out he lived nearby but said he hadn't ever ridden those trails before nor really mtb'ed much. His bike was sporting what appeared to be the original Farmer-John tires with absolutely no tread left down the middle. This guy was ripping it up as fast as us having never ridden the trail and hardly ever ridden a bike off road and he was on bold tires! tough. He tagged along with us for the rest of the riverbottoms, rode behind us, but never really dropped off.

Time was clicking by faster than we figured and everyone was starting to feel the ride, so we decided to hit the asphalt back by the airport then down to Fort Snelling and in. Amazingly Thorny seemed as spry as usual. I don't know how that guy does it. I was in full cramp mode on the last stretch of paved path, and it looked like WW was close as well. We fumbled our way back to the coffee shop and clocked in 5 hours from our departure. Not bad for a cold day.

I slammed down a big burger and a brat and felt much better. Which was good because I still had a lot I wanted to do that day. One the way home I swung in by Tomac's house. He had recently completed a paver project similar to mine and had some extra sand left. I picked up those and headed home. It was about 2:30 when I got home which meant there should be enough daylight left to finish out the pavers, I just hoped my body had enough left to do it. So I took a quick shower to warm up and headed back out to rent the vibrating compactor I'd need and start laying the joint sand.

This part went pretty well, I pack all the pavers down and they got nice and flat, then started sweeping in the sand. The locking sand is unique, it's a polymeric sand which actually bonds to iteself and the pavers once it's wetted. So I made several passes, filling in sand then running over with with the compactor, vibrating the sand into each crevice. Once I was comfortable that all the gaps were full I'd move onto the next area. I worked until dark and then a little more, but I did get all the sand down and packed that night. I couldn't do the wetting part because it was too cold, so that had to wait for Sunday.

Getting up Sunday I still had a little shred of thought in me that I'd do the 'cross race. However my shoulder was completely worked over from the Enduro and running the compactor the night before (don't worry, the doc assures me I need to keep using it as much as possible and that I'm not hurting it any worse by doing this stuff). I decided maybe a test spin would be good to see how I felt. I grabbed the cross bike and headed down the road. I had my answer within seconds. No. My legs were actually alright, but my butt and shoulder were telling me no. So I stayed home and felt soft for not racing, but what can you do. I sprayed a frame and did a bunch more yardwork instead, lower impact stuff. I filled in a bunch of low spots in the front yard and raked some area's out. Then went in and did a little work in the shop. It was a good recuperation day. I made it to almost 9 that night before falling asleep on the couch.

More 953 pictures coming in the next edition.

bbbb

Thursday, October 19, 2006

More 953

So I'm getting pretty excited for this first full stainless frame to be done. It's very close and it just keep looking better and better to me. Since it's not getting painted, it will show off every detail of the workmanship with no option for covering up mistakes. I actually think that's why I like it so much, it looks pure and clean to me, stripped down to the bare essentials and yet really good.

I finally downloaded the next wave of pictures, so here goes, I'll try to pick up where I left off with the last pictures.

I think we left it at the tubes being mitered. Once all those are done, I jig the frame up and test fit all the tubes in the lugs and check the geometry.

Once I confirm that everything is fitting as planned, I disassemble it, prep all the lugs and tube ends and then flux it all up. Stainless steel is far more fussy about cleanliness than regular steel and seeing how both the lugs and tubes are stainless here, I made sure everything was as clean as possible.


Here's how things look fluxed up. I used lots of flux, especially for stainless. Making sure there's no particles or anything else in the flux to contaminate it. Stainless is very different to braze because it behaves the same as regular steel during the heat-up phase, but once it's up to temp it can overheat instantly if you're not careful. There's far less margin of error than with regular steel.

I just use regular Gasflux brand type U white flux for stainless. I know many folks use black flux as it goes to a much higher temp, but I don't like it as much and I think it can encourage overheating on stainless. I personally feel that if you're brazing properly you shouldn't have any problems with type U flux on stainless. I use it for all my S & S couplers as well.

Below are the BB and the seatlug all fluxed up and ready to go.


Once everything if fluxed I start tacking the frame right in the jig. I braze one part of each lug. Once it's tacked, I pull it out, make sure it's aligned and then proceed to braze each joint fully.

Here's a picture taken while brazing. As you can see the flux gets all clear and watery, that's how you know it's up to temp. I get the whole lug up to this point at the same time, by heating it evenly over the entire surface. Once it's up to temp, I quickly add silver and work it through the lug with the heat of the torch. You can see the two locations I added silver from in this picture, near the bottom of the headtube band and on the underside of the downtube socket. I flow the silver through the rest of the lug from these points.

I used 50N silver on all these joints. It does seem to work slightly better on stainless, but it also tends to flash out farther than 56 silver. Meaning it gets on the lugs a little more, but so thin you can't feel it, and the flash cleans sands off easily.


After brazing the whole thing is soaked in water for a few hours to remove the flux, then I sandblast the joints to remove any residue and clean them up. At this point you can really see how you did on the brazing and if there's any cleanup work to be done.

This lug looks really clean, meaning I did my work well, so I can proceed to sand the lugs down a bit and smooth the finish.


Here's how things are looking after some sanding on the lugs. Notice all the lug edges are very clean, no excess silver, no gaps. Nothing but nice clean sharp edges. That's what I was talking about at the start of this entry!

I sand them down to make sure all the surface irregularities from casting are removed and to make them smooth and flowing.

If everything is done right, this is how it should all look, just a fine tiny line of silver at the lug edge, crisp edges all around and no material removed (sanded off) from the tubing at the lug edge (undercutting).

I clean up all the other lugs in the exact same manner and move on to the rear triangle, starting with the chainstays.
As I mentioned in an earlier post, Reynolds has their own 953 dropouts. They are very well made and match the tubing diameters perfectly. So in this case I decided to just round the top and bottom of the dropout tab slightly to make it fit inside the chainstay rather than slot the stays. Same look, but this is probably a slightly stronger construction method.

The dropouts are actually made of 953 material, so they're strong, very strong. But they still file pretty darn well, I'm amazed at this material.


Again, I flux the heck out of everything and position the dropout correctly in the stay. One work of caution here. You really need to make sure the angle of the dropout and position are spot-on with the 953 dropouts. They're actually too strong to cold-set. I was unable to bend them at all without the aid of heat! I'd recommend a jig for installing them to make sure you have it right.

Again, since they're stainless, only silver filler will work. So I filled these with 50n silver, which is about the only thing that can fill a gap that big. Even at that, it's not the easiest braze.

Here's how it looks after brazing and soaking off the flux. Notice the natural fillet of the material, that's what you want since I'll be scalloping this area out in the next step.

The silver fills up the gap about all the way along the tab inside the dropout, so that chainstay is filled about 1-1.5cm back into it. With the current silver prices, that's probably $20 worth of filler in the dropouts!


Next step is what I consider one of the highlights of any well made frame. Scalloping the dropouts. This is the traditional way to finish dropouts and it takes some skill to make it look really sharp. The key here is the scallops should be even, vertical and not undercut at all into the actual dropout. I also prefer the look shown here where the top and bottom of the dropout tab seamlessly blend into the stay. I think this is able as clean a look as possible. It makes me really dig the shape on these Reynolds dropouts.

When using this technique, the driveside dropout needs to have the scallop ground further up into the stay for clearance to the cassette cogs. The amount of space needed is a function of how large the smallest cog is on the cassette.

But this means you need to plan ahead a little and be sure to fill in the inside of the drive side dropout with more silver, or start the fill further up the stay.

Again notice the dropout is angled in to make sure the axle camping face is perpendicular to the axle. My jig worked pretty well and things came out nearly spot on. Which is a good thing since I don't have much hope of cold-setting those dropouts now that they're brazed in. I guess one could use heat, but you risk melting out part of the braze if you're not careful. Better to do it right the first time!

Well, that's all I have time for right now. Look for the remainder of the build pictures to come soon.

bbbb

Monday, October 16, 2006

house keeping

A couple details I've been meaning to mention on here.

First, if there are folks who've tried to email me from a Comcast email account and had it bounce back I appologise. There seems to be some kind of issue between my web hosting company and comcast. If you have another email service try using that to forward me the returned mail message. Also if you've gotten a returned email to me from another domain and have a means of letting me know I'd appreciate it. I'm trying to figure out what's happening.

Secondly, I get people often submitting the same comment multiple times. I have to assume this is because you submit the comment, then don't see it appear, so you resubmit it. Well due to spam issues I moderate all the comments on here, so your comment won't appear until I go in and approve it, so be patient, it'll show up!

bbbb

'cross

This weekend had lots of bike-related stuff happening. Saturday I managed to spray a couple of frames earlier in the day, then wrap up the last of the sidewalk on the house. After that it was time to clean up for the Vitch's (John Coleman and Kate Carpenter) wedding reception.

What a great time that was. It was held at One-on-One bike studio in Mlps which was the perfect venue for this event. Amazing how well that place cleans up for a bike shop! All the usual Kenwoodies were there to celebrate and a few other friends I hadn't seen in quite a while. One thing is for sure, the Vitches sure have a lot of really great friends. A good time was had be all as far as I could tell.

Sunday was the Boom Island 'cross race. I really wasn't too sure about this. First off, a lot of us were at the wedding reception till about 1am or later and of those I think most were bound to be hungover. Secondly I hadn't actually ridden my bike at all since the Lake Rebecca race the week before and my shoulder was still questionable and quite sore. The doc had assured me though that it would be ok if I wanted to ride.
So I headed to Boom island still not certain if I'd race or just watch, but once I was there, I had to give 'em my $20 and put myself through some misery. I decided I was going to take it easy and not risk any crashes on an already injured shoulder, so I lined up near the back. Big mistake. The race had 78 people in it on a course that was appropriate for about 30. The first couple of barriers I literally had to stop and wait in line to get up them. By the time I got up the second run-up I could see the front of the pack was already a full half lap ahead of me. But I figured I'd just pick people off once it thinned out.
It never really thinned out much though. I can't recall any part of the race where I was riding alone, and I was passing folks almost constantly for the first 6 laps. That's a great morale booster. The course was really set-up quite well, especially for singlespeeding. There were three sets of barriers plus one run-up that you literally had to dismount and run. So 4 dismounts per lap. It was clear that I was outclassed fitness-wise, but I think I made up for it on all the dismounts and remounts. I seem to pass the most people during the couple of seconds I was off the bike rather than the times I was riding. Guess I ought to spent a little more time getting fit. I have no idea where I finished but I know it was a lot further ahead of where I started, so I'll call it a victory.

Shoulder felt fine while riding, but it's still pretty sore today. I guess I'll probably have to do a little PT as the doc recommended, but that's not too bad. Much better than what it could be.

In other news, Terry Bill From Reynolds tubing was kind enough to email me in response to my last posting about 953 weights. He's such a good guy to deal with, and explained that they're using brand new dies on the current batches of 953 which can lead to the thicker walls, but that as the dies wear in, the spec should also become closer to the advertised specs. For the meantime I'm going to keep measuring tubes and setting aside the thicker ones for frames that need a little more material, and using the light ones where appropriate. Thanks Terry.

bbbb

Wednesday, October 11, 2006

so much happening

I was hoping to do a second 953 update here, but I haven't gotten around to collecting all my photos again. So no pictures yet, but I did however get my next shipment of 953 which is from yet another manufacturing lot. That makes three manufacturing runs that I've received tubes from now and disappointingly this lot was virtually identical to the previous two. Most of the main tubes are over the spec for wall thickness and therefore weight. I did get one 31.7 tube that was nearly right on the spec though. Here's the average weights look now after measuring multiple samples of each:

Tube # Claimed weight Actual weight
SS4130 220g 245g
SS4120 245g 249g
SS4200 238g 290g
SS4210 267g 300g
SS4730 200g 225g
FS4520 (pair) 278g 310g
GS4602 (pair) 288g 267g (yes the stays are actually lighter than claimed)

Pretty much all the 31.7 tubes measure out about .6/.4/.6 butting. The 35mm tubes are thicker .7/.5/.7 or close even the ones that are supposed to be .55/.35/.55

I don't think this is necessarily a bad thing as I like tubes with these butt thicknesses, but I think it would be of great benefit to builders if a $600 tubeset actually met the spec. I'll continue to use it, but I just won't expect it to be as light as claimed. That actually makes it a much more versatile tubeset. I'll be curious to see how the Columbus XLR compares.

On to other news...

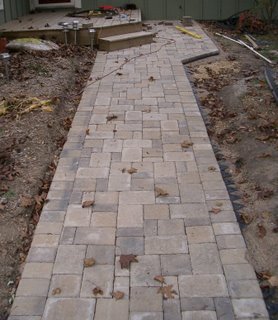
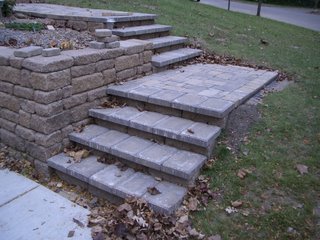
This weekend I decided to take advantage of the nice weather and try to finish up building the front sidewalk. I took Friday off to get a head start putting down the sand and leveling it for the pavers. I ended up hauling about a yard of sand in to get everything to final grade. Next I put down the first set of caps on the steps as those would determine the starting edge for the pavers. Then finally I started laying in pavers to form the walk. Here's how things looked at the bottom set of stairs (which is where I started).


I took a little break from the pavers Saturday morning to go over to my folks place and help them re-roof their shed. That went quick smoothly and we had it all wrapped up before noon. Then I headed back home to hit more pavers. Things went faster than expected and we managed to finish up most of the sidewalk. We really like how the cobbles go with the aged feel of the retaining wall and the stone on the house.

We just have to put the locking sand down between the cobbles and run the compactor over the whole thing and it'll be done.

Sunday... The Lake Rebecca 'cross race was Sunday and I was excited to start my 'cross season. I had missed the first two races due to being out of town, so this was going to be my first. I've always liked this course, it's a shorter loop, but with a nice run-up in the woods and a second grassy run-up that I tend to do well on. Both run-ups are long enough that those with gears usually remount and ride them, but I find it's faster for me to run them since I've only got one gear and it's big!
I registered for the B race since I haven't been training much, it seemed appropriate. It was raining at the start which also seemed appropriate, but made for a greasy course. We had gone about halfway around the first lap when things went awry. I was fairly close to the front and feeling good with my position when someone went down immediately in front of me. It was really, really early in the race so the pack was still very tight and I had no room nor time to find a line around him, so I ended up riding right into him. I pulled up as hard as I could, but my front tire got caught up in his bike and threw me right over the bars. While landing I felt a distinct pop in my shoulder and figured I was out of the race.
I got up really fast and felt ok, aside from a little soreness in the shoulder and some blood running down my leg, but I noticed the other guy wasn't up yet (probably partially due to me landing on him and his bike). I helped get his bike off him and asked him if he was ok, to which he replied yes, but he was still doubled over in pain so I hung around. Once he was upright enough to walk back I picked up my bike and began to finish out the lap.
Backing up a minute or so, after I immediately got up, I moved my bike out of the main line in the trail. Despite that someone else got tangled up in it. They didn't crash, but nearly tore my front wheel off by yanking on their bike while their pedal was in my spokes. Nice. Then I finally yelled at him to stop because his pedal was stuck in my wheel, I removed his pedal from the spokes and he yanked the bike hard, scraping his pedal all the way down my fork, tearing off about 6" of paint with it. Bonehead. That part pissed me off.

Anyways.... I finished out the lap, and pulled in at the start line to tell them everyone was alright and to get some tools as my stem was turned and my brakes we messed up. I spent a couple minutes fixing the bike and decided I didn't feel too bad, so I went back out and raced. Of course this all happened on the first lap, so when I headed back out I was really far off the back, but who cares. I just rode hard picked up places where I could and finished out the race near the back. I still felt good for finishing.

Later that night though I really started feeling some pain in the shoulder. I iced it and took some advil and tried to sleep that night. Still hurt a lot in the morning so I went to the doc. He said it was probably pulled out of joint partially during the crash and is just really inflamed, so I'm on big anti-inflammatories for the next few weeks. As long as I didn't tear any of the rotator cuff he says I should be back to racing in a week or two. Here's hoping.
unfortunately the guy I ran into didn't fare as well. He walked out and looked fine at the finish, but it turns out he broke a rib and I'm sure is far more sore than me.

So I'm laying low this week, taking it a bit easier trying to heal up so I can still get in a couple more races before the season ends in November.

bbbb