Thursday, September 28, 2006

Reynolds 953

I finally got around to downloading my first round of pictures of this 953 build. Since there doesn't seem to be much information out there yet about 953 or working with it, I'll try to be as descriptive as possible on my experience. But first, a warning.... new builders are always eager to try new materials. This stuff isn't easy to use and it's really thin, I really don't recommend using it unless you've got a good number of frames under your belt and you've brazed a lot of stainless.

But hey, look at the sparkly tubing decal!

Ok, down to business.
Here is the complete tubeset that I'm using for this frame. 
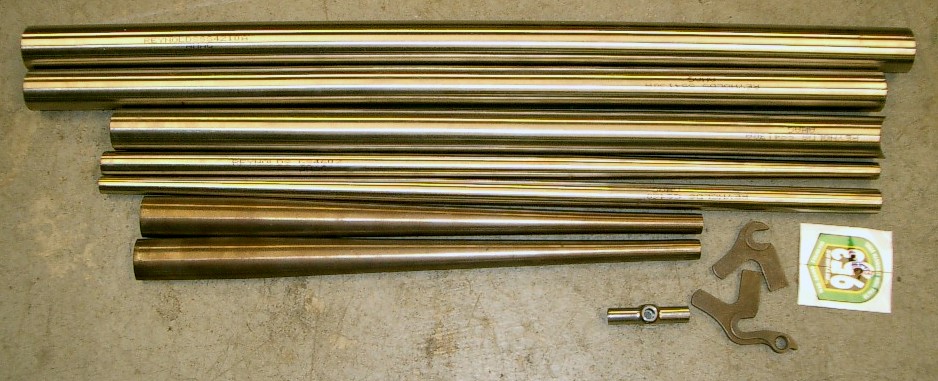
Ignore the appearance of the curve in the tubes, that's simply my bad photography skills shining through. The tubing is very straight actually which is even more impressive since this is the Aged (heat-treated) tubeset. Reynolds offers several options in the tubing in 28.6, 31.8, and 35mm tubes. Put simply, they have 2 wall thickness profiles and 2 butt length options to chose from in each diameter. Most of the tubes are on the long side, so for smaller frames, you almost have to use the long-butt tubes and cut off a good chunk of length. For this frame I chose the thin-wall, long butt tubes in 31.8mm top and seat tubes and 35mm downtube (to fit the slant six lugset). The raw tubing has a very good surface finish and as I said is very straight, however it's not very round, especially in the thin portions of the butts. Both the top and seat-tube were about .025-.035" out of round in the center section. The wall thickness is consistent (I measured both ID and OD and had identical out of round values) so it shouldn't affect the strength of the frame, but it's a little annoying to deal with. The downtube was closer, it was only .010" out. I suspect this may be due to the aged tubeset, that the distortion occurs during the heat treatment which is good for me, I'd rather deal with this disortion now before the frame is built than afterwards which could happend with tig-welded frames. Also the wall thickness was slightly thicker than claimed, but that can be a function of die wear at the manufacturing facility.

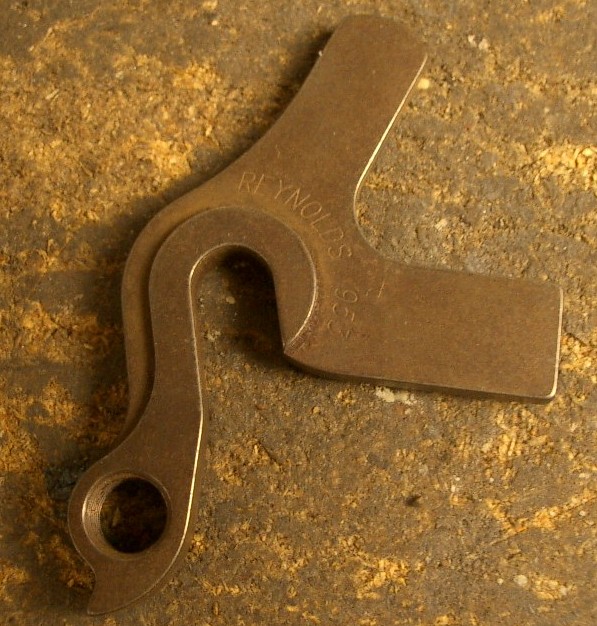
I ordered the whole Reynolds Happy-meal package with this one, so that includes a set of 953 dropouts and a really well made stainless brake bridge. The dropouts are nice, basically the same shape as the Paragon dropouts, but made from 953 material then heat-treated. I'm using these because the 953 chainstays have a larger diameter at the dropout end than a traditional chainstay. They won't fit Henry James plug style stainless dropouts without addin a machined sleeve over the plug and I don't know fo any socket style dropouts that will fit. I prefer plate dropouts like this anyways, but these are really expensive (3x more than Hank!). Reynolds also lists the same dropout but in 901 stainless for a fraction of the cost, but they were out of stock. I've already seen quite a few new flat plate stainless dropouts coming to market presumably to fill this niche.

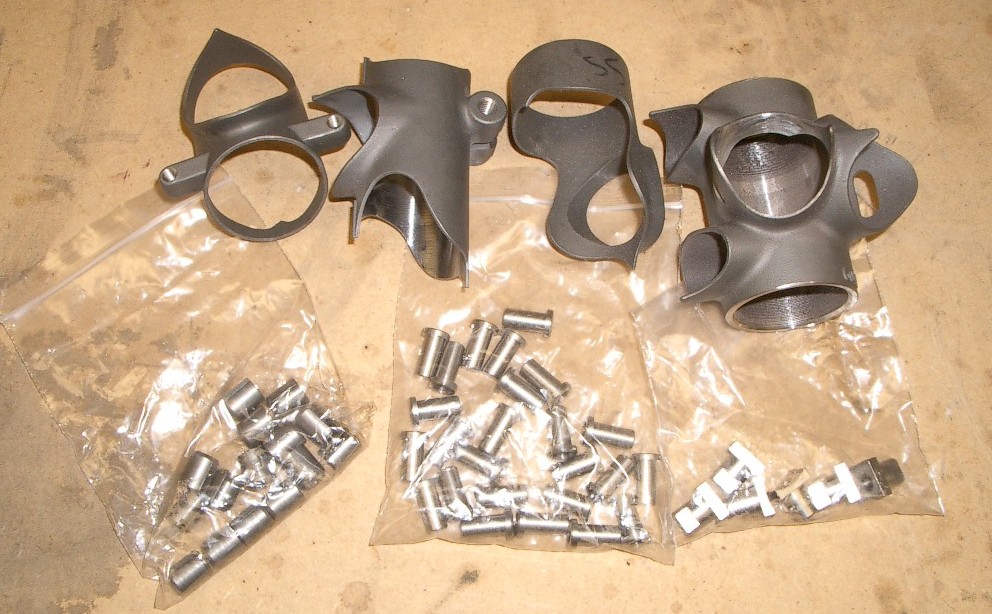
Lugs were the next challenge. This frame is going to be 100% stainless so it won't need paint. There are actually lots of stainless lug option out there these days, which is good. However with the very thin-walled tubing I don't feel using traditional oversize diameter tubes would provide a very stiff frame, so I wanted bigger. That left me with Kirk's slant six lugs which are absolutely perfect for this application. The drawback is that there was not stainless BB shell to match. I searched high and low, but nothing came up. In the end I had a small batch of them custom cast at Long-Shen, so I suspect I've got the only shells to make this work with the Slant Six lugs. All the frame fittings and braze-ons have to be stainless as well.

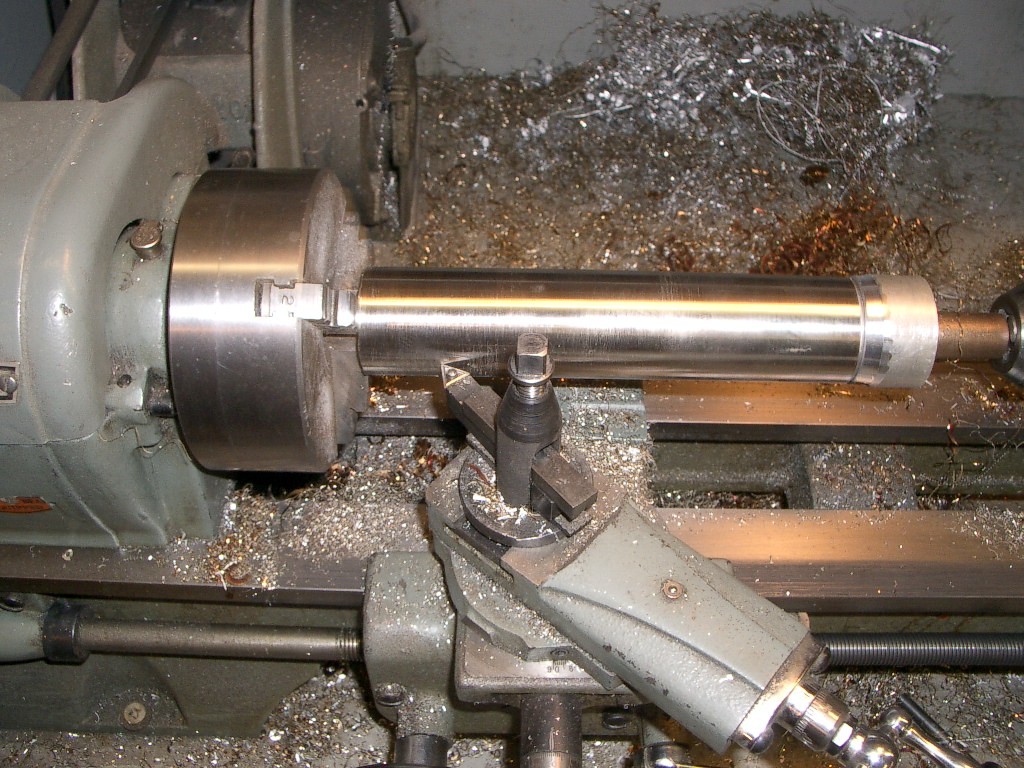
The keen observer will notice in the tubeset picture above that there was no headtube. Reynolds does not offer one, if you want a stainless headtube you have to make it yourself. Again, I searched for 36mm OD headtube stock, but didn't find anything easily available, so I turned my own. I had to start with 1.5" x 11g 316 tubing, then turned the OD down to 36mm and then bored the tube to 33.2mm ID.


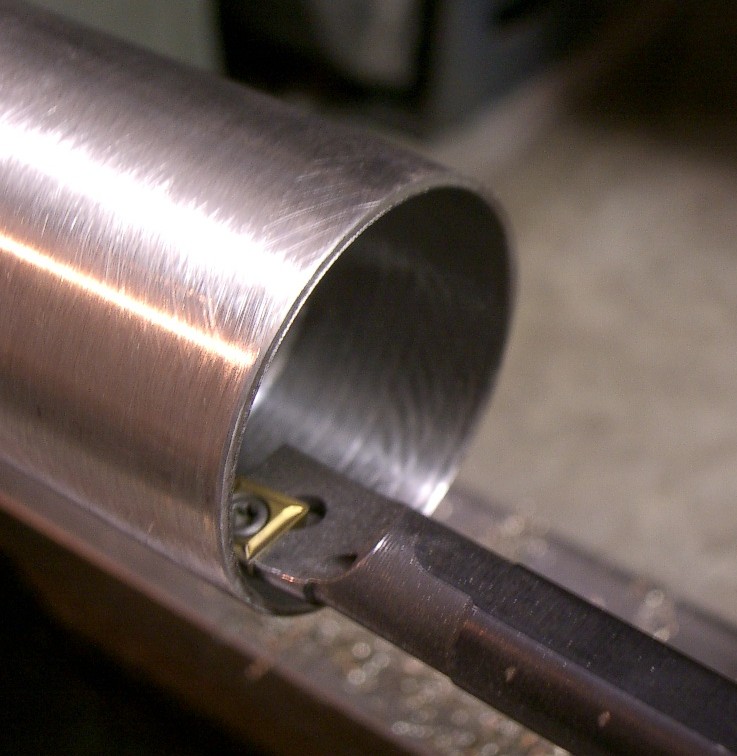
Then while I had the tube on the lathe, I bored the ends down to 33.6mm so that after brazing the leadlugs, reaming the headtube would be easier (less material to remove). The stainless is harder to cut in general, so I want every advantage I can get for the final facing and reaming operation.

This was a lot of work to go through just to get a headtube, I'd vertainly prefer to find a source for 36mm OD stainless tubing in the future, but for this one I got an exceptionally round and well toleranced headtube since it was fully machined!

Mitering the tubing was not as bad as I was expecting. The aged tubeset is very hard stuff and Reynolds has warnings all over their website about how difficult it can be to work with. After doing some work with it, I can say it is tough, but not uncutable (like 853 after welding/brazing).
You really need a solid, heavy, rigid cutting set-up though don't try this on your joint-jigger running on a drillpress. In this picture is appears that the cutter is turning fast, but it's not, about 100 rpm actually and I'm feeding the tube exceptionally slowly (about 3x slower than I would with 4130). But as you can see, the hole-saw does cut it just fine as long as you use the right arrangment.

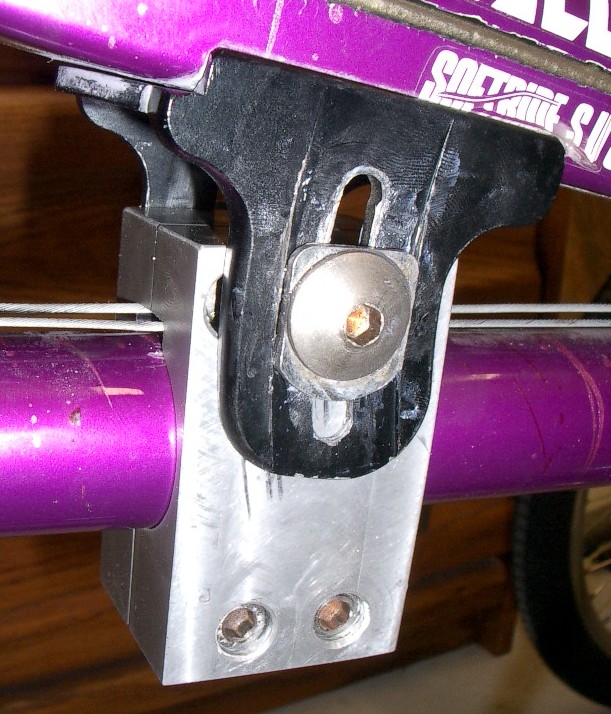
To give you an idea of how rigid things need to be, here's a picture of my tube-holding arrangement and the cutter arrangment. That's a 6" wide tube vise that weighs about 75 lbs mounted on a 15" rotary table on my horizontal mill. The cutter is held in a 1.5" diameter collet which is directly attached to the 40 taper drive of the machine. This thing has a lot of mass behind it (2200 lbs) and have no chatter whatsoever. I think this is about the minimum I would want to use to cut this stuff and not risk tearing or chipping the tubing.

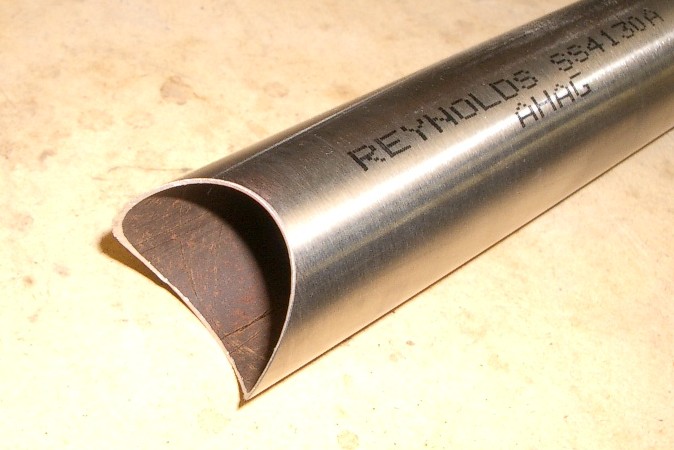
Here's a sample cut, this happens to be the bottom of the seat-tube. You can see the cut is very clean, it just took a little longer to make it.

One other nice note, Reynolds was kind enough to mark each main tube with the tube part # right on it as they do with all their steel tubing. Really makes it nice to know which tube is which without measuring all the butts. I wish other manufactures would follow suit.

That's about all I have time for right now. I'll post more pictures when I have time. The front triangle is all mitered up and ready to go, I just need to get all those pictures together.

bbbb

Wednesday, September 27, 2006

lots to mention, little time

I know it's been a while since I updated. I've just been cranking on the house and shop projects lately, so I haven't been taking the time to write much. I even took a bunch of pictures of house progress, but of course haven't bothered to download them off the camera, so you'll have to wait will next time for photos of finished work.

Since last we spoke, I started tackling the soon-to-be sidewalk in front of the yard. That meant a lot of digging. I had to remove all the dirt where the sidewalk would go and replace it with a 6" base of packed class 5 material. I also needed to dig out the extremely hard-packed earth at the end of our driveway inorder to prep that area for concrete to form our new driveway apron. So I splurged and rented a Dingo. This thing was great. It's basically a walk-behind bobcat with a smaller bucket, which makes it much more maneuverable and less damaging to lawns.
So I spent a full day running this thing and filling up trailerloads of earth, then hauling them to the back yard and unloading. I think I did about a dozen trailerloads in the end between the sidewalk and the driveway. We were able to really regrade the north side of the house well with all that dirt, should be much better for drainage.

Here's how the sidewalk area's looked after gettin' the dingo treatment. I took out about 6" of dirt, then the following weekend went back and filled it back in with class 5 filler and compacted it. So if I had a picture of how this looked now, it would be flat and hard and ready for some pavers!

Here is the driveway apron all formed up. This was the real reason for getting the Dingo. We had been driving over the dirt that was here for a year now, you can imagine how hard it was. I attempted to dig it out by hand twice. Both times I was out there with a pick-axe for several hours and made a total dent of about 3 cubic feet! The Dingo was well worth the cost just for this. After this picture was taken, I added the re-mesh and some expansion joints, then it proceeded to rain for about a week straight. Once the rain finally subsided, I dug out all the silt that had washed in and we poured it yesterday (pictures to come).

On the shop front, I've been busy too. I got a new toy, a pantograph engraver, which I have yet to even play with. Sometime soon I hope to be able to start learning how to use it, but I should be able to engrave frame parts now, fork crowns, BB shells, dropouts, etc... I'm pretty excited about that.

Cranked out a couple of S & S retrofits and misc projects, but my big exciting news is that I'm finally working on my first Reynolds 953 frame. I'd been waiting for months for this tubeset to arrive and the first one is here, with a second on the way. For those who are not familiar, 953 is Reynolds new super-high strength stainless steel. Currently it's only available in very thin dimensions geared towards racing frames. Columbus also just announced this week that it will be debuting a similar stainless tubeset at Interbike this year, undoubtedly to compete with 953.

Seeing that this is stainless, that opens up some options. The frame I'm working on will be completely stainless steel, all lugs, fittings, tubes! That means it won't require paint. The material is really designed to be competing with Titanium on all accounts (strength, weight, finish, etc).

I had some concerns about the material prior to ordering it. It's incredibly strong, which generally means very hard to cut or work with. They sell it in two forms, a standard version which is designed for tig welded frames and requires a post-weld heat treatment, and an Aged version which is already heat-treated to bring it to full strength (250,000-300,000 psi!!!). The aged version is designed for lugged construction since silver brazing will not heat the material up enough to damage the heat-treatment (which welding would destroy). But it's also fully hardened, so I expected to only be able to miter it by abrasive means. However upon working with it a bit now I've discovered I can miter it on my horizontal mill with a holesaw just like I do with any other tubing. The key is that I have an exceptionally rigid mitering arrangement and I have to feed the tubing much slower than regular 4130. It's definitely hard stuff, but not as bad as Aeremet was.

I have been taking pictures of my progress along the way on this frame, just haven't uploaded there here yet, but I will so watch for lots to come. There aren't a whole lot of 953 frames out there yet and even fewer lugged ones so stay tuned.

bbbb

Monday, September 11, 2006

'cross dresser

Yup, it's September and it was cold and damp this weekend. That can only mean cyclocross!!!

In preparation for the greatest sport ever, I've put phase 2 of my rigid 29'er plan into effect

A little shorter stem, drop bars and some skinnier tires and presto: Cross bike! This was part of my original design actually. When I was designing the geometry for this mountain bike I realized that it was nearly exactly the same as my 'cross bike, just with more tire clearance. 72 degree head angle, 75mm drop. Really the only thing I'd do differently for a dedicated 'cross bike would be a slightly shorter top-tube (but the 90mm stem makes this one acceptable) and a little shorter chainstay. Think of it as a 'cross bike with lots of mud room.

I threw the Cane Creek wheels on there, but I'm actually thinking about running the Stans rims and these tires without tubes. I just didn't feel like changing out the Crows that are currently on the Stan's rims. The King/Stans wheelset weighs pretty much exactly the same as these Cane-Creek wheels, but they are wider and might give me a little more meat on the ground for traction. Either way, I'll be going tubeless with the Stan's sealant for 'cross this year. I'll give a full report after a few races.

I did a short shake-down ride in Battle Creek on it last week, fine tuned the saddle height and angle to fit the drop bar position better. Then took it out Saturday for a real ride with Tommy Mac. We started at his place in Mlps, then headed down to Lebanon hills, did 2 laps there then high-tailed it back to his place. Turned out to be 4 hours, which was about 3 more than I'm in shape for. But the bike was good. I stuck with the 34:14 gear which feels pretty good all around. It's a little bigger gear than my usual 42:18 'cross gearing, but this bike is light and quick and it feels ok, think I'll stick with it.

In other news, I spent Saturday afternoon and all day Sunday finishing up the shed. It's done though with the exception of paint (which is about 1/2 done thanks to Beth). The trim took me a little longer than I expected, but it came out good and matches the house perfectly (it's really important that your shed matches your house exactly!). Sunday it drizzled all day, kind of right between drizzle and actual rain, which combined with 50 degree temps made for a mildly miserable day to work outside, but I really wanted to finish it up so I persevered.

Finally some good news (at least for my pocketbook): the Jetta is back and shifting great. After a week of bleeding the new slave cylinder every night, I finally gave in. I figured there was something else wrong that I wouldn't be able to diagnose, so I took it to a transmission/clutch shop. Had to drive it there in 2nd gear since I couldn't shift it at all while the motor is running. Once I finally got there, I told them my whole story, what had been leaking, what I'd replaced and what it was doing now. They were a little baffled, but thought I was on the right track. They said they'd start by just re-bleeding the system. When they called me back about 5 hours later, the guy said "we bled it, bled it, and bled it, then left it sit an hour and bled it and bled it and bled it again." Finally after several tried they got all the air out and it was shifting as smooth as silk. The only charge was for an hour's labor which was much better than the thousand dollar charge for dropping the transaxle to replace the clutch that I was envisioning. He hoped this was all it needed, and so far it seems to be working. I'll keep my fingers crossed.

bbbb

Tuesday, September 05, 2006

Laboring

Labor day weekend, the name says it all. This weekend's mission was to build a new shed in our back yard. I had reinforcements, well one anyways. Beth's parents came to town along with another couple who are friends of the family. So while all of them went out shopping, Beth's Dad (Bob) and I worked.

I had a pretty good plan layed out or so I thought. We wanted to put the shed next to the house, in a narrow strip of land that's pretty much useless. Unfortunately with all the Phone line work Qwest has been doing in our yard, they added an above ground junction box back there and dug in new lines through the area I wanted to use. Then I found out one of the neighbors still doesn't have working phone service off that line, so it's a sure thing Qwest will be back showing us their spirit of service by digging up our backyard again.

Therefore we decided to relocate the shed rather than have to move it when Qwest decides they messed up again. We moved it to the Northeast corner of our lot, tucked back in the trees. It's actually a great spot for a shed, fairly out of the way, and it blocks out some ugly parts of the neighboring yard. Downside is that it's on a hill, a short but steeply sloped hill which required some digging. So before we even started we were behind schedule since we now had to dig out a big chunk of earth.

Thankfully Pat (my contractor that did the addition) was working next door that day and he had his Bobcat there. It didn't take much to convince him to bring it in the back yard and do the digging for us. That alone saved us about 6 hours of digging through tree-roots trying to level the ground. What a guy.

Once he had worked his magic, we assessed the situation and decided we needed some kind of retaining wall to hold back the slope now. Fortunately it would be completely behind the shed, so it didn't need to be anything fancy, a few left over 2x8's and a couple posts worked fine. The first day we got the ground all leveled, placed and leveled the concrete blocks that would support the structure and built the entire base-frame of the shed. We wrapped that up by about 3pm and headed off to Menards to purchase the lumber we'd need to frame up the walls and roof the next day. That turned into it's own adventure.

We took my car (jetta wagon) with my trailer, same as I'd done about a hundred times throughout this project. Got to the store fine, and made our order at the lumber desk. Now, I had been having an intermittent issue with the clutch on the car about a month ago. Somehow the Hydraulic clutch had gotten some air in the line and wasn't releasing fully, making it exceedingly difficult to shift. I bled the clutch and the problem was fixed, or so I thought.

The car wasn't shifting very smooth on the way to the store, which has me mildly concerned, but not worried. But when I pulled it into the lumber yard to load up, it wouldn't shift at all. I could shift it fine with the engine off, but as soon as I started it, I was locked in a gear and the clutch wasn't releasing much at all, so stopping didn't work so well either. We continued loading lumber since it was all paid for and I figured I could get home. We had about 1000 lbs of wood on the trailer I'd guess and I came to the rationalization that I was going to have to drive home in second gear and not stop.

So we took back streets home, with flashers on the whole way. I could get the car to shift from 1st to 2nd with a bit of coaxing, but it was more like a powershift, which doesn't actually work well with this transmission. I'm not sure how Volkswagen designs their transmission, but there's no grinding or clunking when trying to force a shift, you simply can't move the shifter into position. period. Clever in that you don't tear up the syncros, but virtually impossible to shift if the clutch goes out, unless you have divine intervention to line up the gears just right as you're trying to jam the lever around. less than ideal.

So I left it in 2nd gear all the way home. I avoided stopping at all costs since I had to turn off the engine to actually come to a complete stop since I couldn't get the clutch to release much at all anymore. But eventually we made it home.

The next day we started off by bleeding the clutch again, I figured that would fix it for another week or so until I could figure out where the leak is. No dice. No amount of bleeding will get this thing to release. But during the process I could see a small amount of fluid coming from the slave cylinder bleed screw area. Got the car down to the garage and left it there, too much shed work to do, the car would have to wait.

We framed up all the walls pretty quick, then got going on the trusses. Once we figured out the angles for all the cuts, those went up quickly too. After that, we started on the siding, which really started making it look like a shed. We got about 80% of the siding up and were beat, so it was time to call it a night and get some dinner.

Sunday, Beth's Folks decided to leave town early to avoid traffic, so they were up at 5:30 to hit the road. We saw them off and promptly went back to sleep. I was still beat. Once I got up at 9, I headed out to see what I could get done. Unfortunately it was wet and the forecast was for more rain. I managed to get the last 2 sheets of siding up, but that was about it. The rain came and didn't let up all day and night.

I headed to the shop to finish up some indoor work that I had wanted to get done. I machined a neat little fix for a custom trike with a softride beam. The bike had the old clamp-on beam mount and the rider had crashed and broken the mount. Softride hasn't sold these for years, so I had to come up with a more robust fix. I debated brazing the right fixture on the frame, but that would damage the paint and still require me to make the fixture, so instead I machined out a new beefier clamp-on mount. This one should hold up for years!

It was kind of fun to make too, a nice machining project. Not to mention it'll get the owner back out on the road quickly, which was my main concern since this trike belongs to a woman with Muscular dystrophy and this is really her main transportation. It's a neat bike, upright trick with the beam, with a special mount out front specifically designed to hold a milk-crate nice and low where it's easy to load. I haven't heard of the maker before, the only decals say "Rain City" and it was supposedly custom made for this woman. Anyone heard of it?

Monday the skies cleared and I headed back outside to work on the shed again. I managed to get all the roofing up. That ended up taking far longer that I thought, but that wasn't due to the roofing, but rather the crappy 2x2 boards I had used to fasten the roofing to. I tried this new stuff called Endura roofing. It's a corrugated asphalt product that comes in 48" x 79" sheets. You simply need 18" spaced purlins to nail it to, no plywood to shingles required. I thought it would be a big time saver to install and it would have if I had made the purlins a bit more stout. As I was I ended up fixing or replacing about 1/3 of the purlins as I nailed roofing on. Frustrating, but in the end, It's all up and it feels pretty darn secure. I think it looks pretty good too.
The green on the siding is just primer, not finished color. Eventually it will match the house, which is a much darker green. Hopefully between the green paint and brown roof it will blend in pretty well with the trees.

I've still got to finish the siding on the peaks, build the doors, put up the trim and install the window. It sounds like a lot, but I think it should take one more solid day then it should be ready for final paint.

Now I have to go figure out what to do with my car....

bbbb